Do you cringe at the idea of filming yourself in the gym?
You’re probably thinking, “I’m not one of those YouTuber/TikToker or social media twats who constantly posts pictures and videos of themselves lifting/flexing/showing off their physique.”
Or maybe, “I already feel so self-conscious in photos. Videos are worse. What would people think of me?”
Yes, pointing a camera at yourself to video yourself lifting can feel awkward. But you should do it. Because your lifting videos, warts and all, is an underrated tool that you’re probably not using to improve your lifting.
If you aren’t videoing your lifts, you’re missing out
I assume you have a mobile phone with a camera. But most likely, you aren’t using it at the gym to video your lifts, for the reasons above.
Obviously, the best way to improve your training is to work with a (good) coach. But if you don’t have one, then videoing yourself can be one of the best ways to improve.
Even if you’ve got years of experience in the gym under your belt, videoing your training is a good idea. Because videos help you to quantitatively evaluate your training – form creep happens even to experienced lifters.
Whether you’re self-coaching or working with a coach, you should consider filming yourself every time you train. Here’s why.
Video shows you what is, not how you feel
Some days, you feel awesome. You’re pretty sure your hips are below parallel on your squats or your butt stayed on the bench while benching pressing.
Some days, you’re tired or sluggish – perhaps you didn’t sleep or eat well and you feel like crap. The sets feel harder than they should be. Even warm-ups feel heavy and slow. Naturally, you’ll nocebo yourself, convinced that today’s session is going to suck.
Video doesn’t lie. Video footage is objective evidence, and how you feel is irrelevant.
Maybe you felt great, but the video tells a different story; your squat was high or your butt lifted off the bench when you were pressing the bar off your chest.
Maybe you felt like crap, but on video, the set looks much better and easier than it felt, which can help boost your confidence and morale, and psychologically makes the heavier working sets more manageable.
More often than not, your subjective experience will be wrong. The only way to be sure is to video yourself and review the footage.
Video is a record of your progress over time
Let’s say a few months back, you squatted 180kgs for a very grindy double. This week, you squatted 180kgs for a double again. Same load for the same lift, no improvement, right?
Well, if you recorded both sessions, you can compare the videos. Upon comparing, you noticed that your bar speed this week is way quicker, which implies that you’re making progress, even though you squatted the same weight for the same amount of reps. For most people, remembering exactly what they had for lunch the day before is already a struggle, much less how a set felt like 6 months ago.
A video record is both quantifiable and qualifiable data. It helps you to spot patterns and monitor progress.
For any particular lift, you can keep replaying your video to scrutinise it. Is there a portion of the lift that needs to be strengthened? Are there some minor tweaks that you can focus on to refine your technique? Did the recent adjustments in your programming work? These signs help you or your coach make better decisions about how to help you progress.
Video helps you get feedback from others
If you’re training on your own without a coach, video is definitely beneficial. You can post your video to online forums to request form checks, and to ask for advice.
Maybe you didn’t know that your press grip is inefficient, or you’re yanking your deadlift off the floor. These consistent mistakes can be barriers to progress, and can become ingrained bad habits that are hard to unlearn if you don’t correct them early on.
Video allows others to observe things you might not have noticed. It helps others help you.
There are helpful communities out there, where you can leverage others’ experience to spot these red flags for bad form. Of course, not all advice is good, so be discerning about where you post and whom you take advice from.
Video is also useful for your coach, if you have one. Depending on your schedule and training preferences, you may not train with your coach at every session. Usually this occurs if you’re travelling, or if you split your training between your coach’s gym and maybe your home gym. Having videos of yourself training while on your own can help your coach keep track.
So, how should you video your lifts?
Here are our recommended angles to video yourself from, and some reference photos – these angles allows you to see the most amount of things from a single angle. If you’ve got something specific that you’re trying to keep track of, feel free to adjust accordingly.
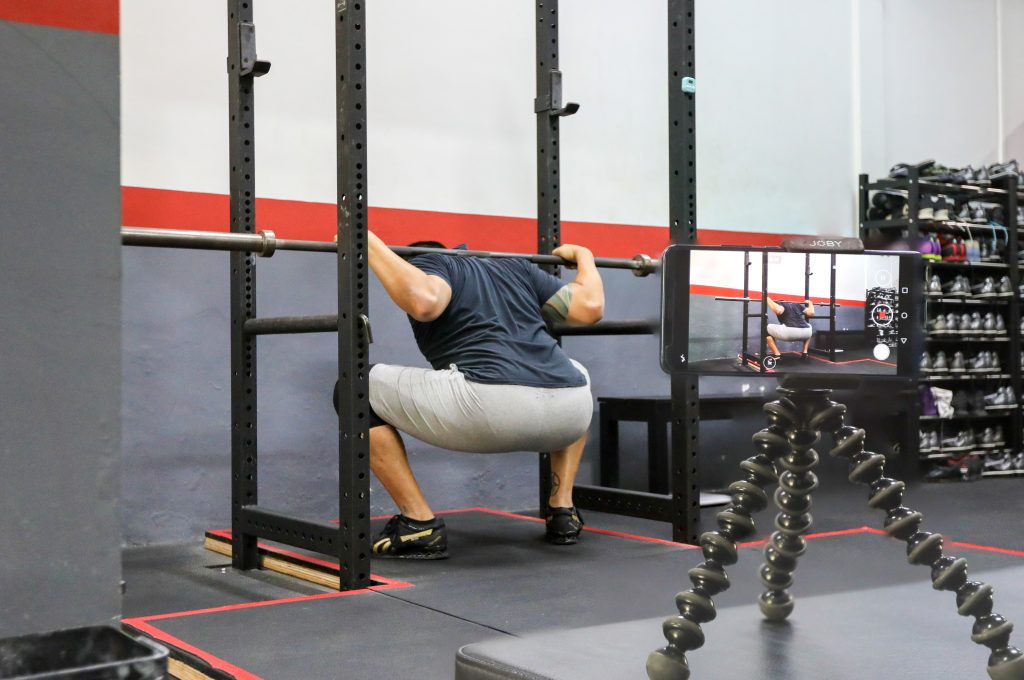
Squat
– From the rear
– 45-degree angle
– Hip height
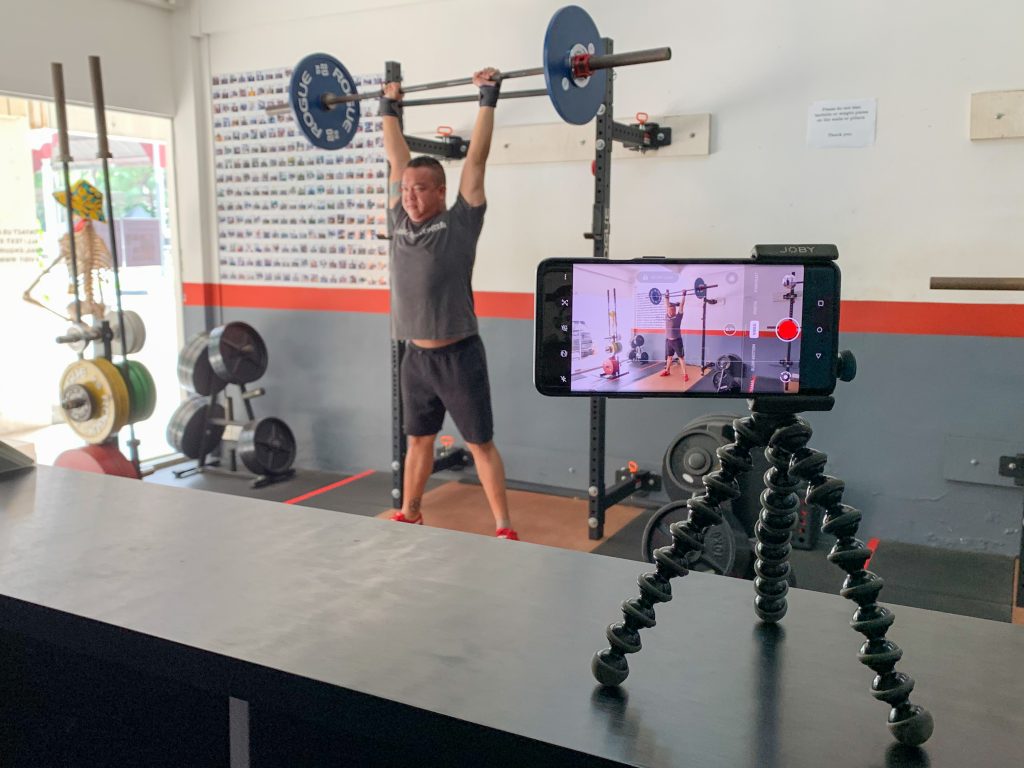
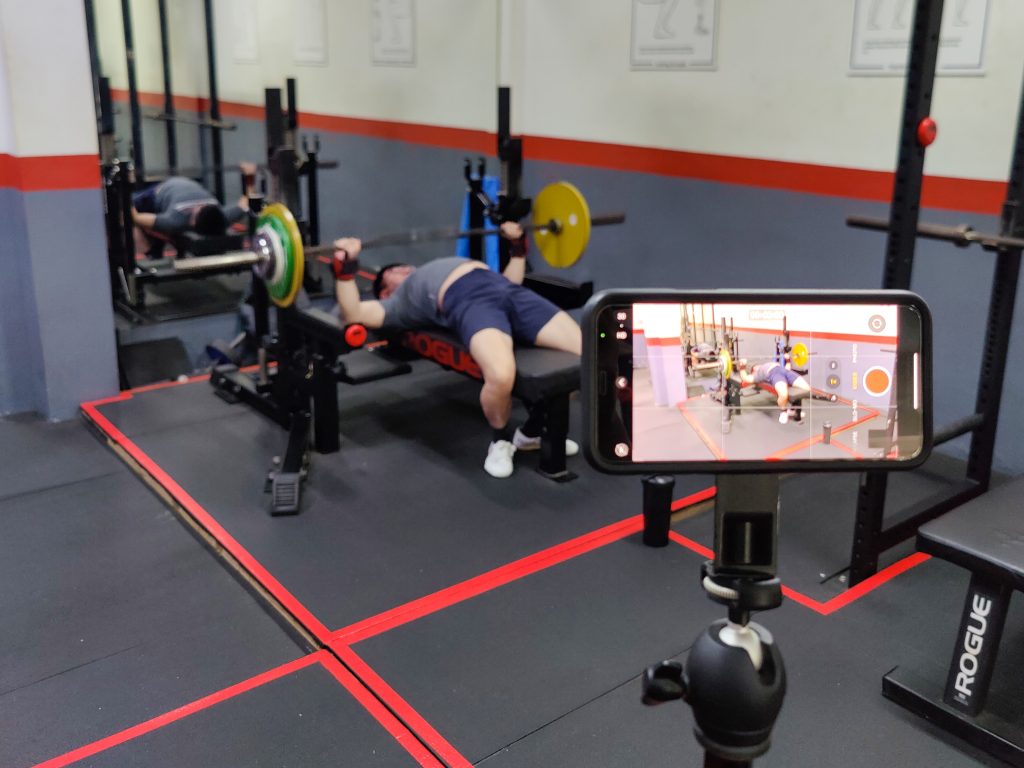
Press, Bench Press
– From the front
– 45-degree angle
– Shoulder height
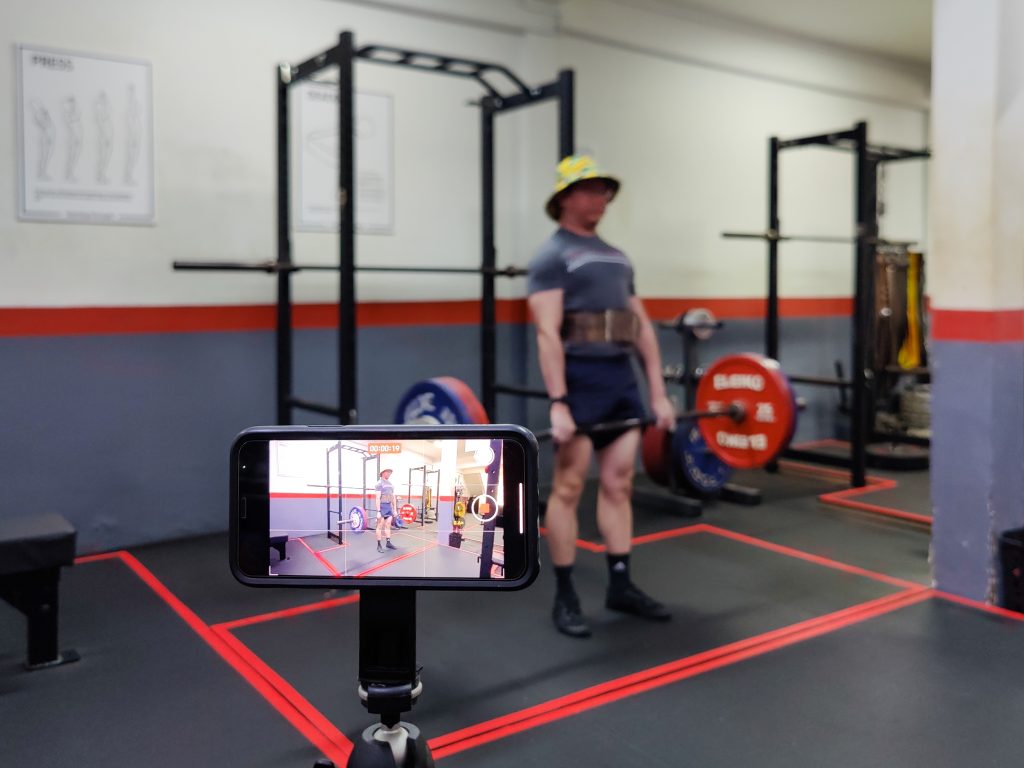
Deadlift, Power Clean
– From the front
– 45-degree angle
– Waist height
For all lifts
– Sounds kinda obvious but make sure that your whole body and the entire barbell is always in the frame
Having a buddy to help you video your lifts is very handy. If you’re alone and trying to set up your phone to video yourself, you can lean your phone against a dumbbell or kettlebell.
Of course, the best way is to get a phone tripod like the Joby Gorillapod, which is small, light and easy to set up. There’s lots of fakes that cost less than the original, but in my experience, the ball joints loosen very quickly. Buy good, buy once.
Camera tripods with attachments that mount your phone are also good alternatives. They’re better than the Joby tripod for shooting from higher angles, but they’re also bulky to bring around. Just use whichever is more convenient for you.
Other tips for taking useful video
Name and date the file. Your phone camera will probably default to some gibberish numerical name, so rename your file. Standardise the format, so that you can easily find it later for review and comparison. Also, curate – you don’t need to save every single set. The last working set or the top set will suffice.
Log it in your training log. Since you’re already keeping a training log, just put an extra note that there’s a related video (this is why you need to date it). There’s also software that allows you to log your training and upload videos. Whatever logging method you choose, make sure that your video is linked with the rest of your log.
Video size, resolution and format? This isn’t actually important, as long as you have enough storage space. Though one thing we do recommend is shooting in landscape mode for a more spacious image.
Sharing on social media. Why not? We know how it feels when you finally nail that PR. Congratulations! Celebrate your wins and inspire others. If you’d like to share with the Hygieia community, tag us at #hygieiastrength on Facebook on Instagram!
Don’t be shy – just do it!
“Do I really look like that?”
If you’re still hesitating because you hate seeing yourself in a video, get over it. Yes, it’s uncomfortable to look at yourself. Maybe your inner voice is really critical.
Your training videos are tools, and really useful ones. If you’re already spending hours and dollars in the gym, then it’s kinda dumb not to be doing something so low effort and high return. Just stick your phone somewhere, push ‘record’ and take that quantifiable data to improve your training.