It’s the last rep of your deadlift set, you’re getting tired and out of breath. Even though you’re fatigued, you remember the importance of setting up properly before each rep. So you grit your teeth, and psych yourself up for that last rep. “Okay, almost there, just one more! Big breath in, set my back tight. Then pull as hard and as fast as I can!” So you yank the barbell off the floor. The bar comes off the floor, hovers just below your knees for a couple of seconds and then goes back down again. After catching your breath, you take a moment to think about what happened on that last rep.
We see this happening from time to time, whether the lifter is new or experienced. Instead of easing the bar all off the floor, they try to yank it off the floor. This occurs for a variety of reasons. One of the reasons is that they’re getting knackered and want to get it over and done with quickly. Another reason is the assumption that yanking the bar off the floor will impart some momentum to the bar and help them move the bar faster.
Slack will result in an inefficient deadlift
Being efficient in a deadlift requires the force generated from your hips and legs to be transmitted through your rigid back, down through your fully extended arms and then into your hands to lift the bar.
If you’re yanking the barbell off the floor, it’s highly likely that something is loose when you start to pull on the bar. We call this “slack”, and it usually happens in the bar, between the plates and the sleeve, and/or the sleeve and the shaft. It can also happen if your arms aren’t fully extended.
If there’s slack in the bar, you’ll feel no resistance during the first few milliseconds when you start to pull against the bar. As you keep going, the slack gets pulled out, and bam! You’ll suddenly “catch” and feel the weight of the bar. You may be in the correct pulling position during the initial set up, but the sudden “catch” of the bar may have a few outcomes. Your back may lose some of its extension and go into flexion. Your hips may rise and end up in a much higher position than it should. Or your shoulders may shift anteriorly, which will cause the bar to drift away from you. It could be one or a combination of these 3 issues.
But first, let’s backtrack. If you’re a new lifter, we need to start from fundamentals – how to properly set up for the deadlift.
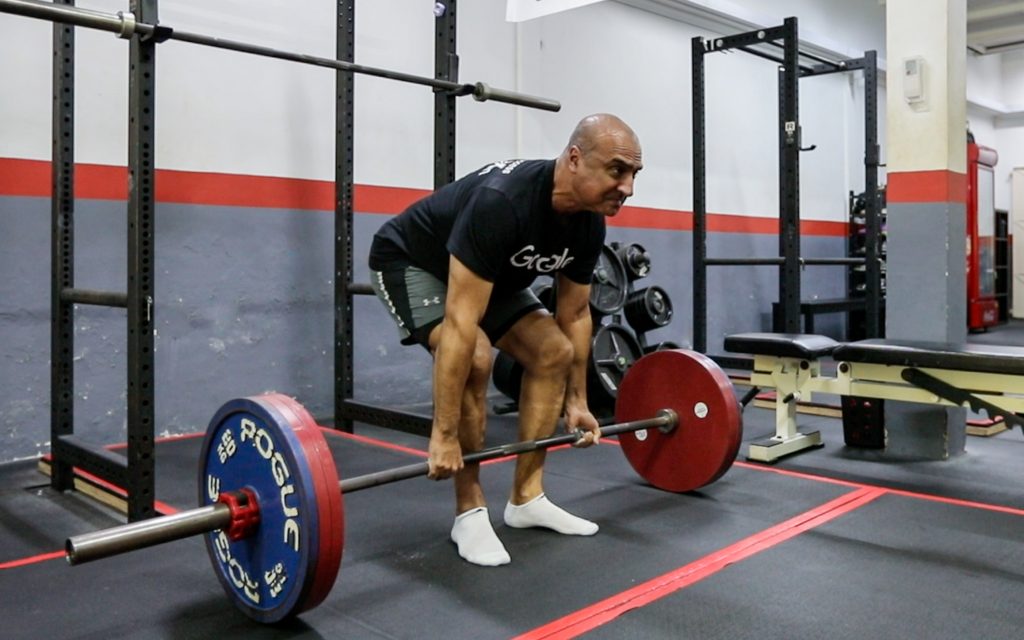
The 5 step deadlift setup
Starting Strength has a great video if you’re learning to deadlift. We’ve summarised the steps, positions and movements below:
Step 1: Take a stance with your shins 2.5cm from the bar.
The stance is the same as a standing vertical jump – your feet will be about hip width apart, with your toes pointed out slightly (about 15 degrees). The bar should be directly over the middle of your foot.
Step 2: Bend at the waist and take a grip on the bar.
Grip the bar a little wider than where your feet are – your grip should not be so narrow that your thumbs rub against your legs on the way up during the pull. When you bend at the waist, don’t bend your knees or lower your hips. Above all, don’t move the bar that you’ve so carefully placed.
Step 3: Bend your knees to bring your shins to the bar.
Keeping your secure grip, bend your knees forward until your shins just touch the bar. Once your shins touch the bar, stop. Shove your knees out a little – so that they’re in contact with elbows and parallel with your feet. Again, don’t move the bar.
Step 4: Squeeze your chest up.
This is the deadlift start position. Without dropping/lowering your hips, squeeze your chest up between your arms, and maintain a tight and extended back. (See this article for the difference between proper chest/back extension and shoulder retraction.) Look at a point about 3m away on the floor. You might feel tension in your hamstrings.
Step 5: Drag the bar up your legs.
Drag the bar up your legs – they should be in contact all the way to lockout, in a straight vertical line. Lockout is when your chest is up, with knees and hips fully extended and back in normal anatomical position.
Down is the opposite of up – while maintaining the extension in your back, unlock your hips and knees, then shove your hip backwards, and let the bar slide vertically down your legs. As it passes your knees, you can bend them to set the bar on the ground.
Where to watch out for slack
Pay attention to Step 4; this is where you pull the slack out of the bar. This is the most uncomfortable part of deadlift setup.
You’ve got to get your back into extension. Your hamstrings will be fighting against your back muscles for control of your pelvic position, and your back must win so that your back can go into extension. Then as you extend your back, you’ll pull the slack out of the bar.
The slack has to pulled out or the force you’ll be generating by the hips and legs won’t be efficiently transferred to the bar.
So how do you ensure that you pull the slack out of the bar on every rep? Here are some cues and tips.
“Ease the bar off the floor”
If you jerk or yank the bar off the floor, you’re going from pretty much nothing to the full weight of the bar immediately – that makes it hard to maintain tightness. It’s much easier to stay tight as you gradually increase the force to pull the bar off the floor.
How do you know if you’re doing this right? As you start to increase the force of your legs pushing against the floor, you’ll start to feel the weight of the bar gradually get heavier in your hands. Once you start to feel the bar heavy in your hands, drive hard with your legs.
You might also hear us say “slow off the floor”; the concept’s the same.
“Feel the weight of the bar in your hands when setting up”
This one’s tied to the cue above, but a simplified version of it.
Before you start to really pull the bar off the floor, you should already feel some of the weight in your hands. When you’re extending your back as you do on step 4, your chest will lift slightly and your arms will straighten out. While doing this, you’ll start to pull on the bar slightly and you should feel the weight of the bar in your hands. This irons out any existing slack between the bar shaft and sleeve, and the sleeve and plates.
“Listen for the click”
The “click” is the sound of the shaft (the centre bit where you hold) hitting the sleeve (the part where you put plates on), and the sleeve hitting the plates.
Ideally, there shouldn’t be any click at all when the bar leaves the floor.
You should hear one click when you’re setting up – this means the slack is being pulled out. Afterwards, it should be silent – you’ll hear us cue you with “silent off the floor!”
If you hear a click as you pull the bar, it means that the slack of the bar wasn’t pulled out when you were setting up.
Fix your technique, deadlift more weight
Small technique tweak can improve your efficiency, which can affect the amount of weight you can deadlift.
While there’ll always be crazy strong lifters who can lift gigantic weights inefficiently, they’re outliers – just bloody strong. Could they lift even more if they paid attention to moving the bar as efficiently as possible? Very likely. For most of us, the goal is to be as mechanically efficient as possible, so that you can lift the most amount of weight possible so as to get stronger.
For new or even experienced lifters, optimising your technique (even something that may seem small) can result in huge progress. So stop yanking your deadlifts off the floor!